
First steps with AWS Batch
Among all services available on AWS, batch is one of the most underrated. The system is elegant, flexible, and works fine (most of the time), if you never heard about it let me explain how it works.
The system is composed by the following components:
Compute Environment
It’s the cluster abstraction that handle the nodes, it can be composed by EC2 instances of different sizes and support on-demand and spot pricing model.
Job queue
A queue for your jobs, each queue can be connected to multiple computing environments; is the simplest abstraction in the service, the only particularity is that you can define priorities for clusters connected to your queue.
Job definition
It’s the job “template”, at this abstraction you can specify which docker image to use, command/entrypoint, values for CPU, memory and others docker options. Most of those parameters can be overwritten during Job initialization.
Job
It’s an “instance” of a existing Job definition.
The way Batch works is quite simple to understand: You launch a job instance, AWS Batch merge it with the proper Job definition, the job goes to a queue and from the queue it gets executed by a compute environment:
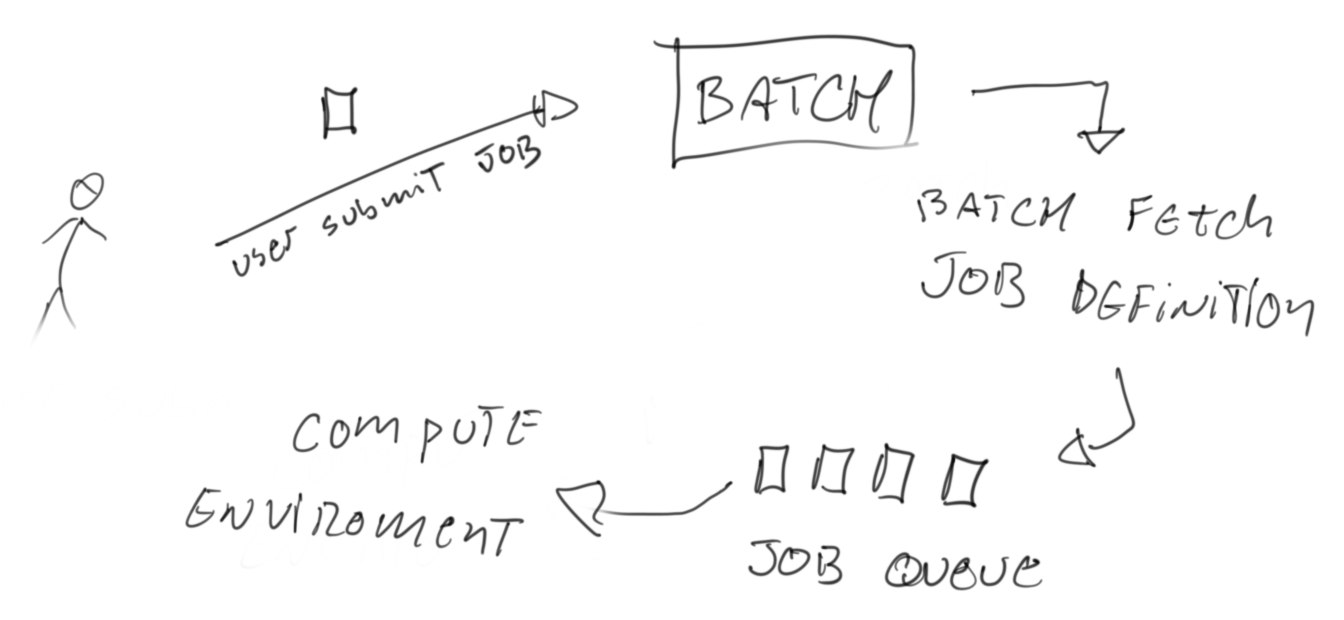
It sounds like any standard job system, the attractiveness lays in the fact that the compute environment can be managed by AWS.
The wizard can help you start using Batch in less than 15 minutes ( mileage will vary according to your AWS familiarity), after you setup the components you can programmatically launch jobs:
import boto3
batch = boto3.client('batch')
command = 'ls -l'
command = command.split()
submit_job_response = batch.submit_job(
    jobName="my-first-job-on-batch",
    jobQueue="my-queue",
    jobDefinition="my-template",
    containerOverrides={'command': command}
)
job_id = submit_job_response['jobId']
Each job is based on a docker image, you can build any sort of dockerized pipeline and call it with your language of preference, AWS will spin up a machine with the amount of resources necessary for this particular job and you are done.
A few options that are nice to understand before creating your compute environment
Compute environment type
It can be either a Managed or Unmanaged version, I would argue that having an unmanaged version defeats the purpose of using AWS Batch, the management effort is too high for the benefits and caveats you are going to face.
In short, by selecting the managed option, provisioning of machines to your cluster will be done automagically by AWS. Everytime there is demand for jobs AWS will spin up EC2 instances to accommodate the required workload, when there is no jobs in the queue all nodes shutdown and you pay nothing.
Provisioning model
By selecting on-demand you are paying the default EC2 pricing for instances, if you go with spot you can get anything between 10% and 99% of the full price, the catch here is that AWS may reclaim the node if there is demand from on-demand services, in this situation your job will be killed. Only pick this option if you are ok with jobs failing occasionally (retry policy can mitigate the side effects)
Minimum vCPUs
Is the minimum amount of resources you cluster should keep up, this setting is specially useful if you are often running a workload of small jobs and don’t want to wait the scheduler to spin up machines (see quirks and tricks).
Maximum vCPUs
Is the maximum number of resources your cluster can grow to, if you send more jobs than the number of vCPUs available, the jobs will be waiting in the queue.
Desired vCPUs
if you are planning to launch a lot of jobs right after creating the cluster you can specify how many cores you cluster must have on first initialization, unlikely that you should be touching this one.
Quirks and Tricks
(1) The AWS Batch wizard often fails
At current date (october of 2020) AWS Batch seems to have a bug while creating a compute environment for the first time, there is a option that says AWS will create the ServiceRole and InstanceRole for you, don’t bet on that.
So the first thing you need to do is create those resources, the instructions from AWS are pretty straight forward:
To create the AWSBatchServiceRole IAM role
- Open the IAM console at https://console.aws.amazon.com/iam/
- In the navigation pane, choose Roles, Create New Role.
- For Select type of trusted entity, choose AWS service. For Choose the service that will use this role, choose Batch.
- Choose Next: Permissions, Next: Tags, and Next: Review.
- For Role Name, type
AWSBatchServiceRoleand choose Create Role.
To create the ecsInstanceRole IAM role
- Open the IAM console at https://console.aws.amazon.com/iam/
- In the navigation pane, choose Roles, Create New Role.
- For Select type of trusted entity, choose AWS service. For Choose the service that will use this role, choose Elastic Container Service.
- For Select your use case, choose EC2 Role for Elastic Container Service.
- Choose Next: Permissions, Next: Tags, and Next: Review.
- For Role Name, type
ecsInstanceRoleand choose Create Role.
(2) The latency to get a job running.
Every 10 minutes Batch service will be spinning up/down machines based on the number of jobs in your queue and the resources required by those jobs. In practice this means that, any job you launch will take up to 10 minutes to start. If you need lower latency you can try keeping the minimum vcpus at a value that match your workload, but remember that this will keep machines always up and incur in costs.
Strategies for handling the latency with minimum vcpus can be improved by using multiple compute environments attached to the same queue and mixing spot and on-demand instances
(3) Default limits
Number of vCPUs
If your account is new, you have a limitation of 64 cores, the AWS Batch by default says the maximum number of vCPUs is 255, but in practice the 64 cores of your AWS account prevails.
Node disk size
Each instance you launch will have 20gb of disk space, for getting more space you need to create a AMI template with a large EBS block and assign it to you compute environment. This change is crucial, when jobs piles up in the queue the same instance will be used to run multiple jobs, sometimes, the cleaning process take longer to start and the instance disk gets full preventing subsequent jobs to finish.
- https://docs.aws.amazon.com/AmazonECS/latest/developerguide/ecs-optimized_AMI.html#ecs-optimized-ami-linux-variants.html
- https://aws.amazon.com/premiumsupport/knowledge-center/batch-ebs-volumes-launch-template/
Docker volume size
By default, Docker allocates 10 gibibytes (GiB) of storage for each volume it creates on an Amazon ECS container instance. If a volume reaches the 10-GiB limit, then you can’t write any more data to that volume without causing the container instance to crash.
The best solution is to use a image based on Amazon Linux 2, this allow the docker container to use all space available in the instance, if using the default Amazon Linux 1 you will need to change the template.
Conclusion
Setting up an AWS Batch system is pretty straight forward, but real life use cases will soon hit the limitations of size for docker/instance. After you learn how to tune your compute environment the service become a really interesting option for offloading tasks to AWS in a reliable and cost effective way.